Serverless has become a movement in application development because it allows developers to focus on code and leave infrastructure to the providers, e.g. Amazon Web Services (AWS). It is important to consider a secure architecture when using Serverless because, although the provider provides security features, the use of security is the responsibility of the developer. This article will focus on how to get started with Serverless using Amazon Web Services.
What is Serverless?
Serverless is an infrastructure framework to deploy your application code and application framework without having to provision any servers, whether physical or virtual. Traditionally you would deploy a server, install and configure an operating system, install and configure required software (e.g. PHP, Python, Java), install a database (e.g. MySQL or MongoDB), setup an application framework (e.g. Laravel PHP, Ruby on Rails), and configure your server to be accessible on the Internet. That's a lot of work! With Serverless you can get going within minutes.
With Serverless you can run your application as functions; this concept is called Microservices. Rather than deploying a large application that is deployed together and needs to be maintained together, you can deploy functions which can be maintained individually. For example, you can have the following functions in your basic application: create account, verify account, verify login, retrieve user information, etc. When create account functions needs to be updated, you update that function without affecting the other functions. The create account function becomes its own service, and the other functions are also their own services.
In addition to functions, you can setup databases, authorization, and other Serverless infrastructure depending on your provider. This is done by updating your Serverless configuration.
An Example of a Very Simple Serverless Configuration
You use a Serverless file that defines your infrastructure you plan to setup (i.e. deploy) to your provider.
Observe the example serverless.yml configuration below.
service: simple

frameworkVersion: ">=1.26.1"

provider:
    name: aws
    runtime: nodejs8.10
    product: myproduct
    stage: dev
    region: us-east-1

    iamRoleStatements:
    - Effect: Allow
        Action:
        - lambda:InvokeFunction
        Resource: "*"

functions:
    helloWorld:
    handler: functions/helloWorld/handler.index
    events:
        - http:
            path: v1/helloWorld
            method: get
You then use the serverless command line tool by deploying the configuration.
cd simple
serverless deploy
Note: You can use the shortcut sls which is short for serverless. Future commands will use sls.
When this is deployed, it will create the following:
- S3 bucket containing the configuration for my service
- API Gateway to route the
get and post events to the helloWorld Lambda
- The
helloWorld Lambda function containing the Node code from src/helloWorld/handler.index
- CloudWatch logs to capture events for the
helloWorld function
You will be able to make an HTTP GET request to an address such as https://004ueoizyd.execute-api.us-east-1.amazonaws.com/dev/v1/helloWorld.
When you make the request, the following occurs:
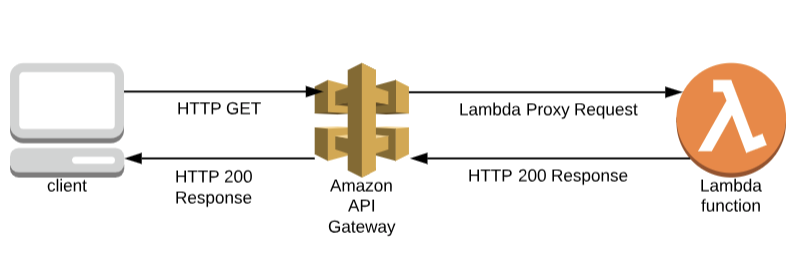
HTTP GET Request via the API Gateway
Adding a Custom Domain Name
You are probably wondering how you can use a custom domain name, e.g. myapp.com, instead of the automatically generated address. Yet, it can be done.
Add the serverless-domain-manger plugin to your configuration:
npm install serverless-domain-manager
Update your Serverless configuration
service: simple

frameworkVersion: ">=1.26.1"

provider:
    name: aws
    runtime: nodejs8.10
    product: myproduct
    stage: dev
    region: us-east-1

    iamRoleStatements:
    - Effect: Allow
        Action:
        - lambda:InvokeFunction
        Resource: "*"

functions:
    helloWorld:
    handler: functions/helloWorld/handler.index
    events:
        - http:
            path: v1/helloWorld
            method: get

plugins:
    - serverless-domain-manager

custom:
    customDomain:
    domainName: api.mydomain.com
    certificateName: api.mydomain.com
    basePath: simple
    stage: dev
    createRoute53Record: true
You will need to add the certificate to AWS to finish this setup. I am excluding the instructions and leaving it to the reader to further explore. To learn more about plugins, read the Installing Plugins at the Serverless web site.
I am going to use the automatically generated addresses in this article.
Adding Security at the API Gateway
The example above does nothing to limit access to the Lambda function. This is acceptable if the Lambda function does nothing sensitive and return public information. If the Lambda function returns sensitive data, e.g. customer data, or performs a sensitive function, e.g. deleting a customer account, needs to be protected through authorization. The API Gateway can be configured to require authorization before the lambda is executed.
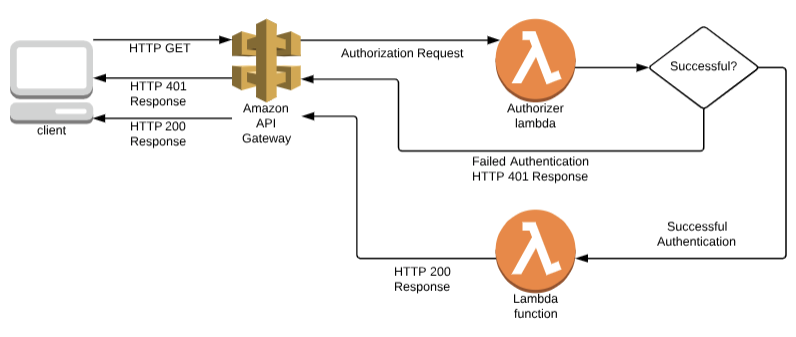
API Gateway Authorization
The above diagram shows an example of the API Gateway authorization capability. It uses another lambda which does the authorization. If the authorization is successful, then the lambda function is executed. Otherwise, the API Gateway denies the request.
The authorizer should be as secure as your application needs. The OWASP Top 10 recommends using JSON Web Tokens (JWT) as the method for using authentication tokens. The JWT approach can be used in authorizer lambda.
To keep things simple, I am going to use a static authorization key instead of a rotating token.
A new file is added at authorizers/staticKeyAuthorizer/handler.js.
'use strict';

const AuthPolicy = require('./AuthPolicy');
const STATIC_KEY = 'mysecurekey';

module.exports.index = (event, context, callback) => {
    console.log('Client token:', event.authorizationToken);
    console.log('Method ARN:', event.methodArn);

    if (STATIC_KEY != event.authorizationToken) {
        callback('Unauthorized');
    }

    const apiOptions = {};
    const tmp = event.methodArn.split(':');
    const apiGatewayArnTmp = tmp[5].split('/');
    const awsAccountId = tmp[4];
    const region = tmp[3];
    const restApiId = apiGatewayArnTmp[0];
    const stage = apiGatewayArnTmp[1];

    const policy = {
        "principalId": "SIMPLE",
        "policyDocument": {
            "Version": "2012-10-17",
            "Statement": [
                {
                    "Action": "execute-api:Invoke",
                    "Effect": "Allow",
                    "Resource": `arn:aws:execute-api:${region}:${awsAccountId}:${restApiId}/${stage}/*`
                }
            ]
        }
    }

    callback(null, policy);
};
The serverless.yml configuration is updated to add the authorizer.
service: simple

frameworkVersion: ">=1.26.1"

provider:
    name: aws
    runtime: nodejs8.10
    product: myproduct
    stage: dev
    region: us-east-1

    environment:
    STATIC_KEY: mysecurekey

    iamRoleStatements:
    - Effect: Allow
        Action:
        - lambda:InvokeFunction
        Resource: "*"

functions:
    authorizerStaticKey:
    handler: authorizers/staticKeyAuthorizer/handler.index
    helloWorld:
    handler: functions/helloWorld/handler.index
    events:
        - http:
            path: v1/helloWorld
            method: get
            authorizer:
            name: authorizerStaticKey
            resultTtlInSeconds: 0
            identitySource: method.request.header.STATIC_KEY
From now on the HTTP request needs to have the header STATIC_KEY: mysecurekey in order for the helloWorld lambda to execute.
A Simple Serverless Architecture
Thus ends Part One of my Serverless Series, in my next article, you will learn about different architectures to employ for a simple use case.
The simple use case is depicted below.
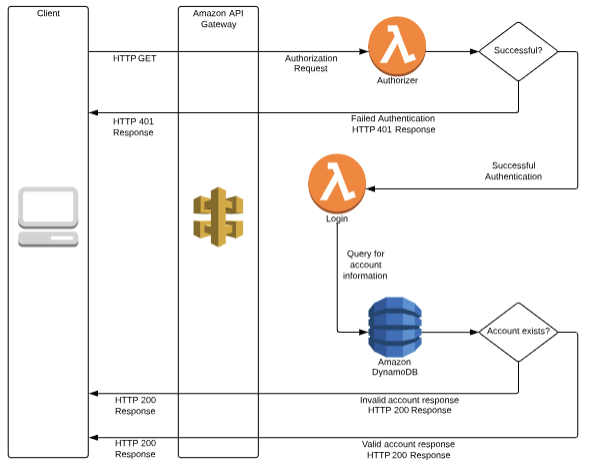
Simple serverless architecture.
Source
The source files are available at https://github.com/miguel-a-calles-mba/secjuice/tree/master/serverless-simple-example for your enjoyment.
Before you go
About the author
Originally published on Secjuice.com
Image by crystal on Dribbble


![Overview of the OWASP Serverless Top 10 [videos]](/_next/image?url=https%3A%2F%2Fcdn.hashnode.com%2Fres%2Fhashnode%2Fimage%2Fupload%2Fv1636408504092%2FBcNttK9q2.png&w=3840&q=75)